Back out on the bike after my ‘holiday in the Highlands’ and up onto the edge of Ilkley Moor within sight of the radio masts and the ’Keighley Gate’ for the latest round of Yorkshire Classics championship for pre unit and rigid bikes.
Thankfully they welcome other pre 65 classes to run ‘non competitively’ giving other bikes a decent ride out. These trials are now established with sections been deliberately eased in recent months; the result is that a great many big old bikes are now been pulled from the backs of barns, out from under dust sheets and creatively restored making for a days sport and a good craic.
The camera has been out and I’ve uploaded two sections to start with ( it’s a lengthy process..) but more will follow so check back.
Sections 1 and 2 section 6
on youtube section 8 section 10
the video is shot in 1080hd so on you tube you can ramp up the picture quality and there is a visible difference, however if your PC/ laptop is not up to it your video will be jerky in which case sacrifice quality for smooooothness
one of the learnings from this weekends video is to line the camera up in the back of the van before setting off. in the last installment from the Poachers bag it clearly showed much of the bfront of the bike during the sections this weeek though the camera is a little high but normal service will be restored next week
Bike work this week consisted trying to rid the bike of the ‘pogo’ effect at the front end which I suspect was down to too much or too thick an oil, certainly full movement was not available and there was a degree of ‘stiction ‘ before the legs started moving. In comparison to the Beta they were along way off so using Italys finest as my benchmark .. Again I started off by dropping the oil from the forks via the bleed screws at the bottom of each leg and refilling with clean 10w oil.
I suspect having now examined it, that the previous oil was a fair bit thicker and certainly dirtier but the new went in easily enough ( 250 ml in each leg although I suspect that 300ml might be nearer the mark) with the handlebars and controls off to gain access to the top of the fork legs, I swapped the Renthal bars for another set but with approx 1 inch lower rise. This would bring the thing more to the set up of my Beta rev3.
With the job completed riding up and down the drive, the forks seemed much better with a ’full’ travel and smooth easy action. The riding position was good and the new bars are a little narrower ( about 40mm all in.) They came originally from a Tiger Cub which reputably was kept in the cellar of a pub and the bars were cut so the bike could get through the door and down the narrow stairs..
This weekend also saw the first outing for the tank post its lining with Wyldes tank sealer. I’d used this product some time ago on other bikes and at that time it was a rubber y, white substance now after a week of curing it is transparent and very hard.
Hopefully this will serve two purposes, keep the tank clean inside and keep the fine rust particles that were repaetedly blocking the carb at bay.
A deep clean clean of the carb everything stripped off and on the desk top, check the plastic float for leaks and cleaned out all air and fuel ways with directed compressed air before re assembly, add new pipe and another new filter and it ran perfectly straight away and all day.. Has the problem been solved , fingers crossed only time will tell.
Next weekend sees two trials and yet the FB will be languishing at the back of the shed for at least one and probably both as alternative mounts are scheduled. Having been to Kinlochleven for the pre65 trial my fancy was tickled to build/ restore ( euphanism for spend more money) a rigid Francis Barnett. They were reputed in the mid fifties to be the finest rigid ‘tiddler’ having the benefit of light weight the four speed box and importantly enough room for a 4.00 tyre as standard. Following the well documented efforts of Steve Rayner and his Tandon I’ve started accumulating bits and pieces already.. Only got a year to complete it so I should hust about make it!
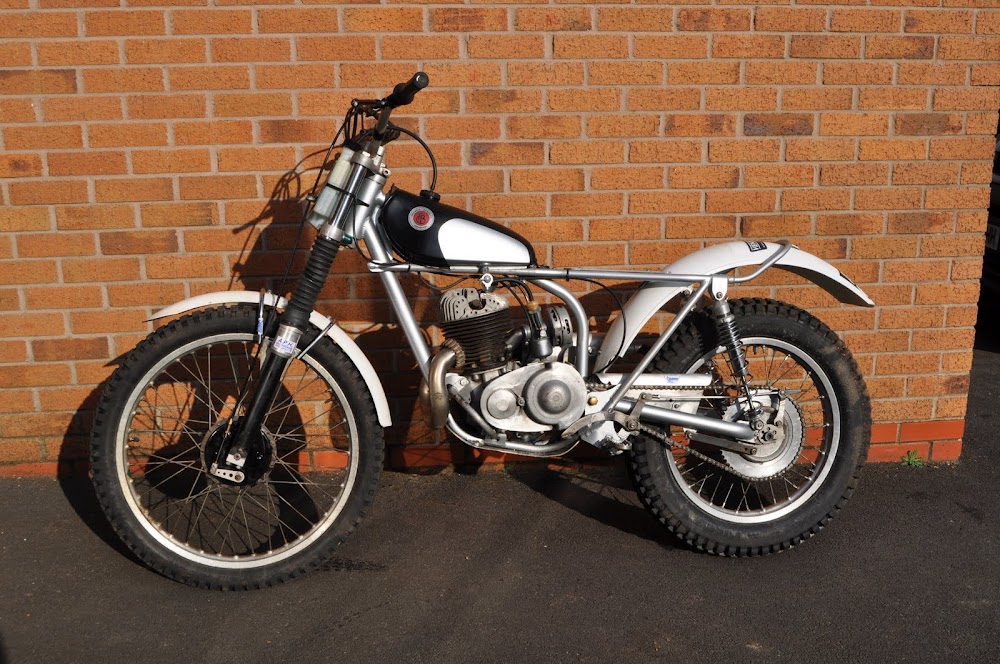
Diary/ Log of the design, build and maintenance of a pre-65 trials replica Francis Barnett for the 2011 season. click on photos to supersize them.
Sunday 8 May 2011
Wednesday 20 April 2011
Cecil Blount DeMille
With no work req. on the bike since the last trial I pushed the boat out, stripped, and cleaned the carb… Again, all clean this time but the time for lining the tank is FAST approaching. I should have a couple of weeks gap whilst I travel to Scotland for the pre65 and SSDT so I hope to get it done before I go and let it ‘harden’ whist away for my ‘holiday in the Highlands’
I dropped the oil from the gearbox and replaced with new… Less than a pint after all and as I stick to using the cheapest 10 - 40w I can find, every couple of events seems an okay working life, it always comes out clean 'ish' and then normally gets put into the ’ used’ can for the lawn mower, strimmer premix, and for the kids push bikes.
The night before I usually load up the van, with tools fuel etc. tool wise i have a small box of specific tools for the Fanny B. ( 4 allen keys, 5 spanners, a plug spanner, a spare plug, a pair of pliers, a hand ful of tie wraps, footpump, tyre guage and a 2lb Yorkshire screwdriver) I add a can of fuel I use PJ1 Silverfire at a mix of 80ml to 5 litres of premium unleaded ( when ever i empty a fuel can i always add oil immediately then i know its in .. leaving just the bike to be loaded in the early morning.
Midland Classic trial at Cutthorpe is about 55-65 miles form home and involves a nice trek over the Snake Pass which this year was thankfully snow free unlike last, The major downside to using the Snake Pass is having to drive through Glossop which must be the speed camera capital of the world over 6 miles I’d guess there are at least 20 cameras.
Arriving ludicrously early at 8.30 I was far from first there with a contingent of folk from 'darn' South already looking forward to some Derbyshire rockery in preparation for Scotland.
I think all northern/ midland organisers miss a trick here as throughout the day I was asked for the best trial in the next couple of weeks for practice on the rocks and frankly Yorkshire classics trip up Littondale next weekend is probably best, but the venue is not what it was as the stream bed is now normally long dry come May. although it is steep and full of rocks large and small It also runs on Easter Sunday this year, which for some is an unacceptable day for sport.
With little to do in the way of pre event prep the MOV camera came out of the box for the first time. The sections are all in the first half and are typical of the going on the day.
section 3 section 7 Waterworks Section 8 section 13 Section 14
the video is much better viewed in full screen, and with the volume turned down!! i'm obviuosly still experimenting at this stage and will be altering the camera angle on the helmet and also doing some bike mounted filming using some unusual angles.. i'll also be using it in Scotland, hopefully persuading a rider to wear it for a couple of sections and getting some shots from my helmet as I follow the trial on my C90!
The bike ran relatively well apart from rider error. Schoolboy error no.1 was not tightening the carb onto the inlet manifold causing the thing to run on a little and a couple of times the carb flooded so it’ll come off again. also with having no side stand on the occasion that mother nature doesnt provide and the bike has to be lain down fuel escapes form the auxilary tank breather if care is not taken and usually care is not taken.. I can see a long walk coming any trial soon..
Other than that all was well the sun shone all day and the sections in the woods although shaded were perhaps the warmest as there was zero breeze. thanks to all the observers for braving such inclement trials weather although those deck chairs and parasols didnt look half bad!
All in a nice day out, the road sections are a little long, but the views are worth it. I think those that travelled hoping for pre Scottish practice will have gone home frustrated. The sections at waterworks have plenty of streams and rocks but seem under-utilised. There is a good wood straight after the water works that only had a couple of sections in it and yet at the land rover site we had a section that ran 10yds along and up a small hill that would have been at home in a conducted trial, so a mixed bag but praise to the organisers for not using exactly the same sections year after year..
The trial was so muck free I think that the bike will go another week without a full wash…
Wednesday 6 April 2011
Mothering Sunday.
First weekend in April was Mothering Sunday AND round four of the Yorkshire Classic Championship. The club has this year really taken to heart the intention to provide a days sport for all. Although sections are difficult enough to take marks from the best in the country, us lesser lights can still enjoy a decent ride out. With nothing bike or life threatening its now often the case that slack ‘dabs’ can be very costly especially as there is little opportunity to make up ‘lost’ marks.
I suspect that in the coming months a number of clubmen will reverse the trend of recent years, and move up to the championship route as that to is now challenging yet rider friendly. So a big thank you to all those who have set trials out so far this year for YCMCC.
Roggerham Gate high above Burnley, has a reputation, It's cold, wet, windy and muddy, in no particular order to the extent that a number of riders deliberately omit it from their schedule. Observers are no different from riders and for the first time this year we had the odd un manned the section, although adding to the normally inclement weather its normally a fair hike for observers to even the sections closest to the car park never mind to the far edge of the moor which must be about 2 miles from the warmth of their cars, even the tenner bounty paid by the club to ever observer was nt sufficient this week.
Last Sunday was certainly the exception though, with the relatively mild spring and no sign of April's showers the moor was practically bone dry, the muddy climbs of the past, becoming simply hard rutted climbs with added loose rock, from the quarry workings, to make things interesting. Even the peat like surface on the edge of the moor was dust dry and after the opening lap at least half the sections were tightened up to try to elicit marks form the riders.
Almost 70 turned out to ride, which is about half of those who have scored points so far in this years championship. One of the innovations that Phil Holey has brought in his role as website editor is to provide an up to date championship table. It certainly provides interesting and stimulating reading and highlights the diverse bikes been ridden and the sheer number of riders who have competed so far this season, does any other pre 65 club have 140 riding members?
Other than the work detailed in the previous post the bike needed nothing doing to it I did not even take the auxiliary tank off so I filled up the tank with super unleaded and PJ1 ( at 70.1) and off we went. The bike ran great from the off and once warmed up carburetted perfectly, grip was spot on with 7 lb in the front and 6 in the back ( an excess of pies in the preceding 48 years means I need the additional ‘air’ suspension). If opportunity presents I’ll ’turn’ the year tyre in the next couple of weeks and it should see us easily through the year,
The suspension paid dividends today and the shocks are now showing a little of their value in fact front and back end move well together and are as good as I have had on a pre 65 bike. However, I think the front can be improved, movement is restricted and ‘slow’ in comparison to other bikes I have ridden and the long awaited transplant of the Norton forks will have to be moved along.
At the end of the trial though I was very happy with how the bike had performed , the chain had remained resolutely in place and other than a problem that feels like the rear brakes binding and robbing the bike of momentum all was well. Thankfully effervescent Ady Brayshaw reckons he has the solution, so given a moment this week we 'll have that sorted. The light at the end of the tunnel is at last shining bright!
P.S. As for filling up the tank with fuel, post trial I refilled the tank and calculated that I had used 1.7 litres to do the four lap, 40 section trial which probably had a 2 - 3 mile lap.
With unleaded at 1.30 a litre that is about £2.35 inc. the splash of PJ1, plus the tenner entry leaving plenty of change from a twenty to visit the pub afterward or buy Mrs.TS some flowers for Mothers day!
Monday 4 April 2011
Clean and lube
 One of the delights of a dry trial in Lincolnshire was that the bike was ‘relatively’ clean post trial. I let what crud there was dry off before taking a stick to it to get any lumps off and then set to with a dry brush to remove what is left. Courtesy of Asda I use there 69p washing up brush, keep it away from the oily stuff and it will last a couple of months. One of the mod's i had done midweek was to add some gaffer tape to the rear edge of the front mudguard to try and prevent the build up of muck around the front pipe during a trial, the root cause of which is the front wheel, not only does it look a mess but its difficult to get off post rial and during the trial does nothing for cooling as the barrel fins quickly become clogged and the exhaust pipe can often be buried under an inch or more of peat/ moorland/ cows**t within minutes of starting a trial.
 The post trial pic of the front of the bike proves that this mod was successful. like wise the massive clearance around the rear wheel is visible in the other snap. one advantage of buying a southern made frame was that the rear clearances are massive, you can literally get your hand in most of the way around the inside of the swinging arm.
The photo also betrays the origins of the silencers tail pipe.. 28mm copper, straight from the back of my van. a little modification to a 45 degree socket soldered to a small length of tube and the whole lot fixed to the silendcer with a very tight staright copper socket. All sprayed up with heat resistant paint, I was sceptical at first but 3 months down the line its proved durable and effective.

Whilst at Pennine Trialsports last week Andy showed me his own bike cleaner. Most riders of modern bikes opt for something like traffic film remover or branded cleaners some of which can leave a white or opaque residue so Andy’s come up with a product that lifts the muck and leaves the bike clean a big claim but one worth testing.

I squirted the stuff on quite liberally and used about an inch or so out of the bottle leaving enough for another 7 or 8 washes and went and had a brew. A couple of chocolate digestives later and I hosed the bike off, I always put a plastic bag or rubber glove over the air filter and try to keep away from the open end of the silencer and not to spray directly on the wheel bearings.
I was pleasantly surprised the remaining crud came off very easily and left the shiny bits definitely brighter than with soap and water alone. A result. To celebrate I even dug out and old tub of turtle wax and gave the tank a quick rub down (luckily the ty80 tank is very small as polishing is not a strong point!
I put the bike up on the stand and oiled the chain; I had been in a Lidl recently and could not resist thier own brand chain cleaner at only 1.19 for a stonking big can and engine de greaser for the same money. ( half a dozen cans of each 'fell'' into the shopping basket alongside the bacon for Sundays butties) I do not want to sound cheap but the stuff works… To lube the chain I use a ‘white’ Teflon product… Harking back to my cycling days I make sure that I lube the rollers from above and below and the side plates, the critical areas been where the rollers meet the side plates as this is where the most movement occurs. I normally lube at the engine sprocket end between the sprocket and the swinging arm spindle this is accessible and any over spray is restricted to the engine cases around the sprocket.

With the wheel off and the brake plate off all the muck was cleaned out and the shoes removed I cleaned up the metal work on the shoes with a flat screwdriver and my plumbers ‘Yorkshire Pads’ and reassemble after lubing the springs lightly and the pivot point and armature, re assembled I gave the brake arm a couple of dozen travels though its maximum movement to ensure all was free and easy before putting the wheel back on the bike.
Tuesday 29 March 2011
The Sun shines .
Hurrah!!
With the bike Mot’d and insured (£64 for the year), I walked to the village Post Office and took up the offer of a FREE road tax disc.
Up with the sparrows on Sunday morning, remembering to put the clock forward as well! I headed off to Lincolnshire and the ‘Poachers Bag’ first round of the 2011 Classic Dirtbike, PJ1 Northern British Bike Championship.
122 easy miles later and I arrived at possibly one of the most attractive starts of any trial, a cracking big arable farmyard (no smells!) A HUGE barn and a butty van serving everything from a cup of tea to full English… Shame it’s Lent then…
The Poachers is a super trial, well laid out by a club that does plenty of pre 65 trials in the area. Sections are mostly on or adjacent to arable farmland involving plenty of trees tight turns, short sharp climbs chuck some stream sections in and add sunshine, and a great day was had by all.
The FB ran perfectly… Late Saturday night as I was cleaning/ repairing my modern trials bike I thought over the chain coming off issue and having earlier consulted Guru Brayshaw earlier in the week I took about giving the chain and its route a good course of looking at. Certainly, the chain line was straight, with me on and off the bike and the wheel/ hub/ sprocket were rock solid. As Adrian had suggested, something was making it come off and the only other moving part was the tensioner which I had already modified a week or so ago.
 Riding the bike the chain occasionally and by that I mean once every hour or so rattleted the leading front edge of the chain guard so as that was the only thing I had not changed / modified I whipped it off and moved the mounting holes about 15mm lower thus in effect lifting the chain guard I also moved it forward approx 15mm and reshaped the lowered edge as under extreme the tensiioner could come into contact with it. The beauty of this was that I removed some metal thus making it lighter!

The good news was that during the 37 sections and 19 miles the chain did not come off once or even rattle… Therefore, fingers crossed and that might be the chain issue resolved.
I also repositioned the handlebars as when measured they were slightly off centre. I also took the opportunity of having the Beta out at the same time to do some comparison of the various measurements etc.
Both bikes were remarkably similar, the foot pegs are the same distance from the front spindle and the FB’s are only 5mm higher than the Beta. The betas wheelbase is about 20mm longer. The handlebars are almost exactly the same except the FB’s are about 20mm higher.
Being cautious I also swapped out the new petrol filter for another of the same make/ model (they are only 99p after all), I stripped and cleaned the carb and bolted it all back up nice and tight I’ll add a cautionary tale here during the trial one cub rider had his bike literally burst into flames, hand fulls of Lincolnshire dirt soon had it out but the fuel cap the fuel line and the engine cases bore the evidence for all to see. The cause? A split in the fuel line seemed the most likely in the event cutting out the piece of pipe soon had his bike back running again. So check your fuel pipes! Again, fuel line is cheap enough so buy fresh and change before it goes hard would seem sound advice.
The only issue with the bike during the trial was the revs raise ‘slightly’ on full left lock so I will have to sort that out in the coming week. The Hebo auxiliary tank worked a treat fill both tanks connect up the breather of the main tank to the hebo unit and away you go. Fuel is taken from the hebo tank by the vacuum created in the main tank so the Hebo empties first, easy. Thanks here to Neil Anderton from who I ’borrowed a pint of fuel at halfway, as insurance more than anything. After the trial, I had about two litres left, so all in I had used about 3 litres for the trial. As the hebo tank is only held on with re useable tie wraps it will come off between road trials.
Leaving the bad news till last. I apologise for those looking for the POV video that was promised .. technical hitches of a pooter kind felled me in my tracks. The New Contour 1080p HD is sat on the desk and will download to the pc however the pc is refusing to co operate, something to do with a security programme incorrectly dowmloaded previously so.. a big gulp... and a new business lap top arriving shortly will be press ganged into trials action!
No trial next weekend as I am celebrating Mothering Sunday!
With the bike Mot’d and insured (£64 for the year), I walked to the village Post Office and took up the offer of a FREE road tax disc.
Up with the sparrows on Sunday morning, remembering to put the clock forward as well! I headed off to Lincolnshire and the ‘Poachers Bag’ first round of the 2011 Classic Dirtbike, PJ1 Northern British Bike Championship.
122 easy miles later and I arrived at possibly one of the most attractive starts of any trial, a cracking big arable farmyard (no smells!) A HUGE barn and a butty van serving everything from a cup of tea to full English… Shame it’s Lent then…
The Poachers is a super trial, well laid out by a club that does plenty of pre 65 trials in the area. Sections are mostly on or adjacent to arable farmland involving plenty of trees tight turns, short sharp climbs chuck some stream sections in and add sunshine, and a great day was had by all.
The FB ran perfectly… Late Saturday night as I was cleaning/ repairing my modern trials bike I thought over the chain coming off issue and having earlier consulted Guru Brayshaw earlier in the week I took about giving the chain and its route a good course of looking at. Certainly, the chain line was straight, with me on and off the bike and the wheel/ hub/ sprocket were rock solid. As Adrian had suggested, something was making it come off and the only other moving part was the tensioner which I had already modified a week or so ago.


The good news was that during the 37 sections and 19 miles the chain did not come off once or even rattle… Therefore, fingers crossed and that might be the chain issue resolved.
I also repositioned the handlebars as when measured they were slightly off centre. I also took the opportunity of having the Beta out at the same time to do some comparison of the various measurements etc.
Both bikes were remarkably similar, the foot pegs are the same distance from the front spindle and the FB’s are only 5mm higher than the Beta. The betas wheelbase is about 20mm longer. The handlebars are almost exactly the same except the FB’s are about 20mm higher.
Being cautious I also swapped out the new petrol filter for another of the same make/ model (they are only 99p after all), I stripped and cleaned the carb and bolted it all back up nice and tight I’ll add a cautionary tale here during the trial one cub rider had his bike literally burst into flames, hand fulls of Lincolnshire dirt soon had it out but the fuel cap the fuel line and the engine cases bore the evidence for all to see. The cause? A split in the fuel line seemed the most likely in the event cutting out the piece of pipe soon had his bike back running again. So check your fuel pipes! Again, fuel line is cheap enough so buy fresh and change before it goes hard would seem sound advice.
The only issue with the bike during the trial was the revs raise ‘slightly’ on full left lock so I will have to sort that out in the coming week. The Hebo auxiliary tank worked a treat fill both tanks connect up the breather of the main tank to the hebo unit and away you go. Fuel is taken from the hebo tank by the vacuum created in the main tank so the Hebo empties first, easy. Thanks here to Neil Anderton from who I ’borrowed a pint of fuel at halfway, as insurance more than anything. After the trial, I had about two litres left, so all in I had used about 3 litres for the trial. As the hebo tank is only held on with re useable tie wraps it will come off between road trials.
Leaving the bad news till last. I apologise for those looking for the POV video that was promised .. technical hitches of a pooter kind felled me in my tracks. The New Contour 1080p HD is sat on the desk and will download to the pc however the pc is refusing to co operate, something to do with a security programme incorrectly dowmloaded previously so.. a big gulp... and a new business lap top arriving shortly will be press ganged into trials action!
No trial next weekend as I am celebrating Mothering Sunday!
Monday 21 March 2011
Keeping up with the Jones's..
well the bike rode better than ever for the first couple of laps today it pulled terrifically and and rode better than i have ever known, to the point of feeling like a modern bike. ( gulp) The rattly layshaft bearing was conspicuous by its absence and long may it remain so! ( was new oil the cure?)

 frustratingly the second half failed to live up to the billing with the chain derailing.. Why the chain continues to derail is now a source of much head scratching.. the chain seems perfectly lined up and is tensioned spot on. the rear spindle is nice and tight and is not moving, the rear bearings are sound I am going to get to the bottom of it sooner rather than later but exactly what the cause is remains an elusive mystery.
 the new fuel filter seems to have done its job. having tried double and even quadruple filters to prevent the very fine sand like deposits in the float bowl and pilot jet i turned to a proper filter, 15 microns and incorporating a magnetic trap.. the cost 99p!!! a third of the 'sophisticated trials filters and a zillion times more effective. the results though will be available Wednesday i suspect when the thing gets opened up.

The Hebo auxiliary tank worked an absolute treat no issues whatsoever, a first rate piece of kit it does what it says on the tin no fuss job done. I'd fixed it between the yolks with the supplied re usable zip ties. I removed the original brake cable tidy and used that mount to fix a PJ1 number board to the front of the tank ( plus a zip tie on the other side and I think it looks okay. Piping it up was easy.. two pipes stick out of the top of the tank one is a simple vent tube with a hebo breather on the end , the other extends to the bottom of the tank and it was the work seconds to connect that tube to the breather on the Ty80 tank cap.


Next up its the Poachers bag first round of the Classicdirt Bike PJ1 British Bike series and I hope to introduce a new feature to the blog.. POV video of every section! I've been doing some test filming and all been well I hope to use a Contour HD helmet mounted camera to bring the action to the screen. before then the more mundane things like MOT's raise there head but hopefully that will be a gimme.

 frustratingly the second half failed to live up to the billing with the chain derailing.. Why the chain continues to derail is now a source of much head scratching.. the chain seems perfectly lined up and is tensioned spot on. the rear spindle is nice and tight and is not moving, the rear bearings are sound I am going to get to the bottom of it sooner rather than later but exactly what the cause is remains an elusive mystery.
 the new fuel filter seems to have done its job. having tried double and even quadruple filters to prevent the very fine sand like deposits in the float bowl and pilot jet i turned to a proper filter, 15 microns and incorporating a magnetic trap.. the cost 99p!!! a third of the 'sophisticated trials filters and a zillion times more effective. the results though will be available Wednesday i suspect when the thing gets opened up.
The Hebo auxiliary tank worked an absolute treat no issues whatsoever, a first rate piece of kit it does what it says on the tin no fuss job done. I'd fixed it between the yolks with the supplied re usable zip ties. I removed the original brake cable tidy and used that mount to fix a PJ1 number board to the front of the tank ( plus a zip tie on the other side and I think it looks okay. Piping it up was easy.. two pipes stick out of the top of the tank one is a simple vent tube with a hebo breather on the end , the other extends to the bottom of the tank and it was the work seconds to connect that tube to the breather on the Ty80 tank cap.


Next up its the Poachers bag first round of the Classicdirt Bike PJ1 British Bike series and I hope to introduce a new feature to the blog.. POV video of every section! I've been doing some test filming and all been well I hope to use a Contour HD helmet mounted camera to bring the action to the screen. before then the more mundane things like MOT's raise there head but hopefully that will be a gimme.
Thursday 17 March 2011
Something for the Weekend
Having done the normal post trial routine at the weekend ( hose down and cover everything in wd40) Today I’ve been preparing the bike for this weekend or more accurately for the following weekend March the 27th is the Poachers Bag which is the first round of the Classic dirt bike PJ1 British bike series.

 General work today then was a deep clean and nut and bolt check, the only loose ones were a fork cap bolt and the rear engine mount needed a tweak other than that all tight as a camels…
 The rear chain cleaned up easily as did the chain tensioner it’s clear that the tension is a lot better since last weeks mod so that must be considered a success and cheap!
Moving forward the shocks and springs had a polish as the chrome is starting to show a little wear, they do work very well though and have a very smooth and consistent action.
The chain case cover came off to reveal some water ingress so I cleaned it all up and let it dry out before re oiling the chain and checking the tensioner before putting new silicone on the case edges and tightening it all back up.
 Up front, I have fitted my Hebo auxiliary tank; the extra 1.1 litres should ensure that the ty80 tank now has the capacity to drag us round on most trials this season. The standard tank has about 2.5 liters including about 600ml of reserve. If anyone has a pic of how theHebo's pipes should be linked to the TY’s tank cap I would be grateful though…
The front wheel has also been dropped out of the forks to check the bearings, and brake shoes. A year in and the bearings are as new. The front shoes are at least three years old and could do with a refresh but as I don’t expect this wheel to be in beyond the next two trials, they will have to suffice.
 Having had the gearbox in bits last time I dropped the oil and it was spotless so filtered it and it went back in… a bit of Yorkshire austerity!
So the bike is just about ready for this weekend at the Red Rose trial at the attractive former maggot farm above Todmorden, ugly name always windy but only 3 miles away!
Sunday 13 March 2011
Details Details..
Thia weekend was Yorkshire Classics premier off road trial' The Captains at Castle Carr high above Halifax, so with the bike up and running I asked the permission of a local club member and farmer if i could use a piece of land for an hour to confirm that the gearbox was working okay and that all the other work in the last week was trial ready.
The box ran faultlessly although the chain dropped three times off the rear sprocket. I believe it could be either the rear chain tension er been a little too 'slack' or that the snail cams are not up to the job and are moving ( i had previously tried to refresh them with a file apparently to no great benefit) so back to the garage.
The Beta offered up its spindle and snail cams ( the F/B spindle was an all alloy Sherco item) The Beta item is 5mm longer and is alloy with a steel nut the cams are in first class condition, they both went on without fuss and were puled up nice and tight. the chain tensioner offered some scope for improvement, the spring arm was manipulated in the vice and given a dog leg so that it was now tensioned behind the rear engine mount this pulled the arm up smartly without it hitting the swinging arm.
Following the poor running earlier in the week the carb was cleaned and yet more grit was discovered so back again to FOUR filters ( one in the tap , two in line and one in the carby banjo!)
With 130 starters on the entry list I got to the venue in good time to find the clerks of the course for the day in buoyant mood despite the heavy rain and snow of my journey and true to form come start time the sun came out.
The bike would not run 'clean' for the first half dozen sections so I returned to the paddock after a lap to clean the carb again and on the section before I did the chain dropped off again so carb cleaned and chain and spindle properly tight I set about the second lap. The carb though continued to run dirty and then clean on and off for the rest of the trial though the chain stayed in place!
Certainly my scores dropped on the second and again on the third lap and the bike at times ran fantastic but the tank is definitely coming off during the week for re sealing in an effort to keep the fuel/carb clean!!
All in an excellent trial well laid out and mentione must be made of the efforts of the Clerks of course messers Anderton and former 'fat boy' brayshaw plus there band of helpers who have been out most of the week planting flags setting sections and all those things that riders take for granted. Special mention to the results team Barry pickard and frank McMullan even with 130 riders and fiftenn sections and the last riders still on the course at 4pm the results were e mailed at just after 8 O'clock Sunday night.
The expert route seemed just about right with many scores under ten and two class winners on just 1 a piece, the club man course was a coat of paint tougher though, in fact on 5 of the fifteen sections I rode the expert route as it was easier than the clubman route!
The bike when 'right' is great I certainly rode sections better than I have before and Ihad cleans where previously i have not I can certainly see light at the end of the tunnel.
One thing that a rider mentioned today that is abundantly clear is that the days of turning up on an old 'barn find' in pre65 are definately over. The very great majority ( all bar half a dozen perhaps) of todays bikes were pure and simple 20th/21st century competition specials and as is the way of these things this season flavour is certainly the Bantam once frowned upon the modern bantam is a proper trials bike and more than capable. Judging by the numbers ridden today and those talking of building one and the number of bits been sold for them at the trial today it seems certainly that the cubs/ james are slipping out of favour. I suspect the reason is threefold. light weight, todays specialist frames are light and narrow, complete bantams for donor bikes are plentiful on the open market at reasonable prices and finally the aging pre65 population wants an easy bike to ride and maintain.
looking forward, up front I will be sorting out the forks to replace with a pair of Norton legs that I have (just for appearances sake really, the works F/B bikes of 1963-66 had the Norton legs so they can be done . I'll also be looking at fitting either a wider front mudguard or a flap at the tail of the present one to keep the exhaust crud free, plus of course the tanks coming off for sealing . Other than that and some cleaning and lubing its ready to go for next weekend. Oh nearly forgot, MOT time as its the Poachers trial which is the first round of the Classic Dirt Bike and PJ1 British bike Series at the end of the month.. I coughed up for insurance earlier this week so looking forward to my FREE road tax disc, on the other hand, diesel was 142.9 a litre this morning..
Friday 11 March 2011
Boxing clever
 A good read of the workshop manual and with the bike laying on its side the gearbox was operated on. Five nuts hold the thing in place taking the timing cover off made access easier but I suspect the job could be done just as well with it in place. I had spoken to those that know and they said ‘it all comes out in one piece’ and in many respects they were right. I didn’t take the gearlever or kick-start lever off the spindles and the case cover lifted off as one piece to reveal the main shaft lay shaft and the forks. A firm pull on the forks left the lay shaft in place and the main shaft bearing on to the work surface ( garage floor with a towel for comfort!) and the thing was soon in bits and the old shaft wiggled out , before doing so you’ll see I took some snaps before I pulled he thing apart. One of the boons of digital photography and large display screens on cameras (anyone spot the deliberate mistake in the gear cluster photo?)

The brand new shaft from Nametab ( only 25 quid!) was easily put into place and ready to go to re install I mounted all the stuff on the face of the cover as two marks have to be lined up on the forks and gearlever a bit of a wiggle and they were in but half an inch proud.. So wiggling the main shaft where it comes out the far side of the box and click it literally all fell back into place.
At this stage, though it was difficult to tell if gears were engaging etc but with fingers crossed, I reassembled the gearbox sprocket clutch etc and re siliconed the cover back in place.
I’d also had the exhaust off and re fitted it with a new copper gasket and heat proof silicone ( the benefits of having a heating business) the exhaust is a ‘snug’ fit around the frame but surprisingly went on easily. One of the benefits of building a bike yourself (and rebuilding it and repairing it) is that familiarity and standard size nuts means the thing comes apart and goes back together with little or no fuss.
The TY80 steel tank was also refitted the fittings for this have been refined and we are now at the stage where under the tank is about 14 inches of 28mm pipe insulation carved to accommodated the coil and tank lugs, the mountings are now well sorted at the front the small tab is located by a rubber strap whilst the rear is held firm with and m10 bolt

The tank is also now proudly displaying its heritage thanks to the best site of the web for decals ISAYDINGDONG I’ve used them 3 or 4 times now and for 3.75 with next day delivery they cant be beaten.
 I have included a picture of the Polisport fuel filter, the first time I ran the new tank I double up on filters and after pulling the carby to bits and finding more grit than a sandpaper factory I will be doubling up again for the next few trails at least
I’ve also modded the brake lever to lift the pedal slightly, I wanted to get away from having to tip my toes too far forward when braking so have removed some metal from the arm so it now sits approx. 10mm higher, this allied with the new alloy spacers my father ‘knocked up’ this week means the braking is now much more acute and immediate
Wednesday 9 March 2011
Spanners out again..
Having bolted the clutch etc back together (when you have done it half a dozen times it seems easy) it felt like a collective pat on the back was in order. As always though pride comes before a fall or in this case a free fall from 30'000 feet!
Hooking the chain back up to the rear wheel I’d deliberately left the chain case cover off the clutch so that when I set it up finally i could see the plates lifting etc, what i saw though on turning the rear wheel was the clutch case wobbling and the primary chain tightening and slackening,,
Neither to any great effect but i could see it and it seems clear that the main shaft from the gearbox must have been 'tweaked' when the drive chain wrapped around it at the last trial. Hey ho so put that on the list of things to do, then starting the bike and giving her a gentle ride down the lane to check the clutch worked okay ( which it did now better than ever silky smooth) stops to talk to a neighbour and go to kick the bike back up again and doh no compression! Still starts and ride okay but the kicker has virtually no resistance.
Having taken a moment to count to ten, I made a couple of calls and the mainshafts do occasionally get bent and indeed do snap clean off in some cases.
So a call to Simon Bateman at Nametab and he has all the bits in stock and not just bits from some old bike but brand new bits and reasonably priced but most striking is his service. I telephoned at 11.25am on the Monday and at ten past 9 Tuesday they were landing on my doormat. Real customer service.
I had whipped the barrel and head off and frankly, there were no obvious signs of distress. The head had very little carbon and the top of the piston only had a paper-thin covering of dry carbon. The piston and barrel were un marked although the piston had clear signs that the rings had been blown past so I suspect that the new rings will cure the thing. Piston size was 67 mm so at least another rebore possible yet when required.
Simons delivery was so quick though that although I’d cleaned the barrel etc up I’d not actually had time to buy the paint for it as I expected to wait a day or two so would have freshened up the appearance. As it is within an hour the barrel and head were back on and ready for the off.
Now the next task is replacing the main shaft. I have not opened up a gearbox before so am hesitant but others say it is not so difficult indeed one tale I was told was of it been done in a field during a trial that the guy went on to win!
So with a fair wind I may do this later in the week if not certainly next week as this weekend the Yorkshire Classic have thier biggest trial of the year The Captains at Castle Carr near Halifax an absolutely perfect piece of trials ground ( woods, gullys, streams hill climbs) and I dont want to not start. due to not been able to get the box back together!
In the mean time a small length of 28mm alloy rod was purchased from ebay ( no name check on this as it took 3 weeks to arrive!!) and it has been swiftly dispatched to my favourite enginner to turm up two alloy spacers for the rear axle one to go twixt the bearings in the rear hub and the other also for the rear hub to move the chain line slightly as it wasnt quite straight.
Tuesday 1 March 2011
Back Together in a Jiffy!
Two weeks down the line since the last post and after an inital flurry getting the alloy welding done on the gearbox and sourcing all the parts for the clutch from Namtab, work forced the bike to take a back seat but back again this weekend to the garage
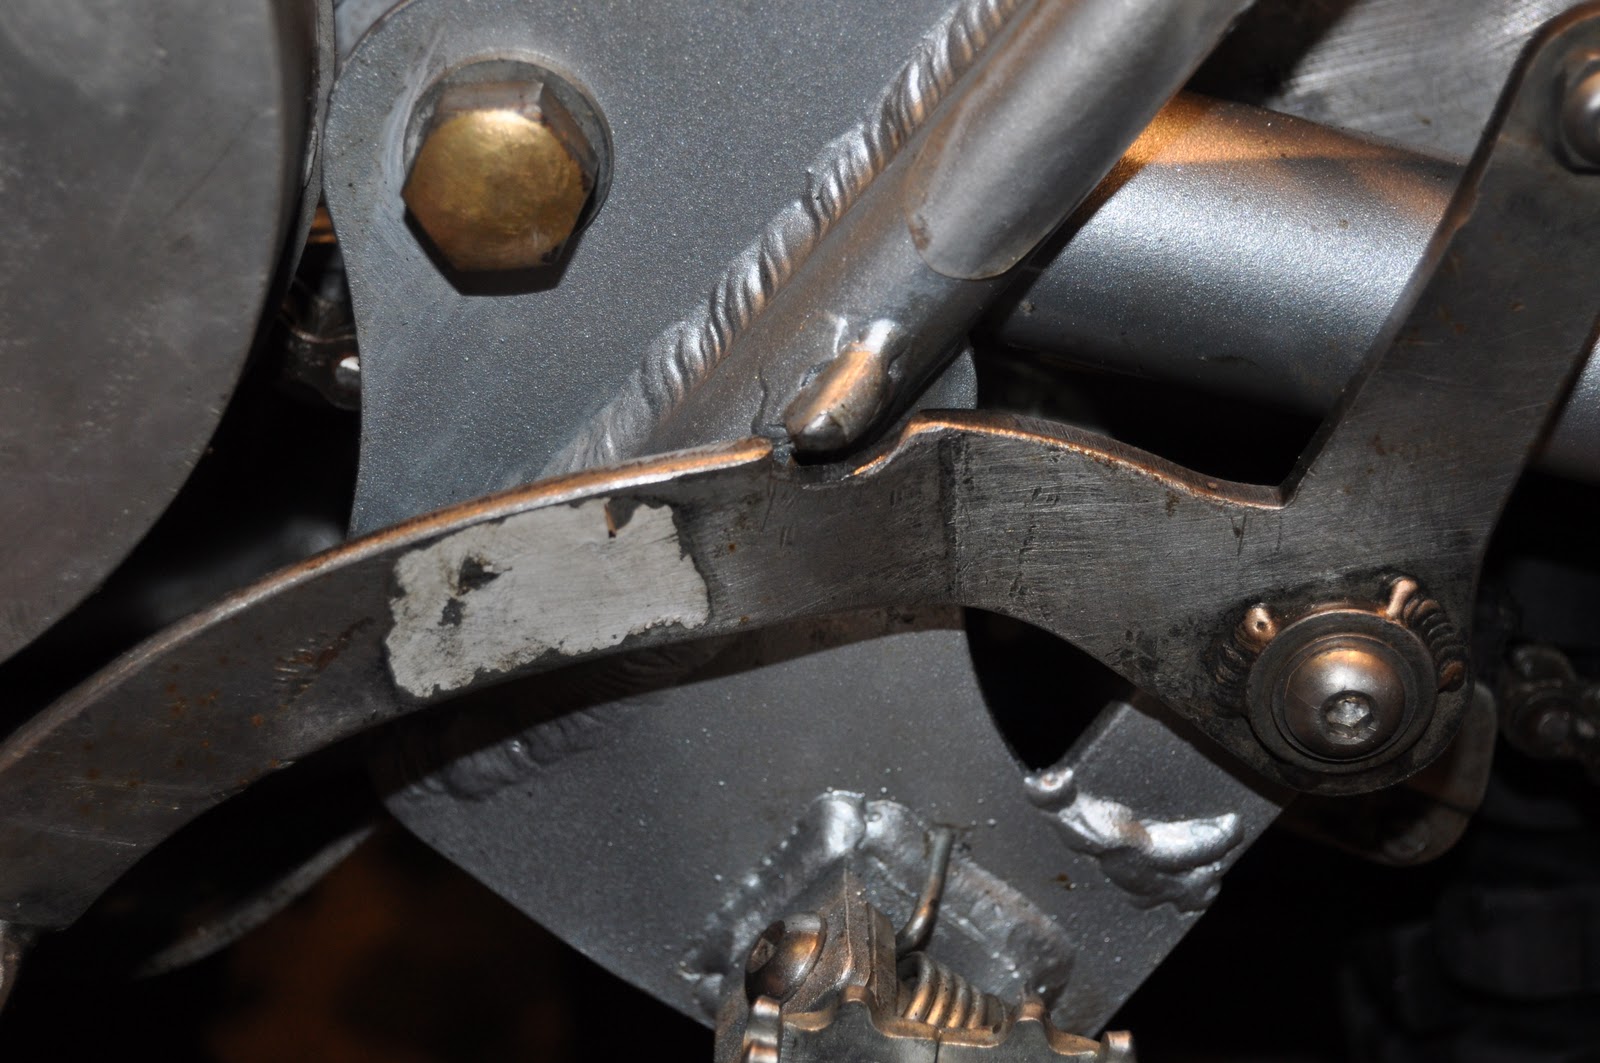
First thing was to sort the welded tab, rather than re attach the broken lug the welder had opted to weld a big blob where the lug had been . hoping that it would be stronger repair. Out with the file to flatten the face where the chaincase bolts up and on the reverse to where the nut and washer sit, in just 5 minutes and another pile of alloy filings on the floor. all was neat and tidy.
The next trick was drilling the mounting hole in the right spot.. not so easy as the bolt mounts blindly into the chaincase so locating the right spot to drill the 'new lug' was a shot in the dark until i had an eurecka moment and out came the chewing gum and onto the face of the new mounting, press the case up to it and hey presto the exact spot to drill.
First thing was to sort the welded tab, rather than re attach the broken lug the welder had opted to weld a big blob where the lug had been . hoping that it would be stronger repair. Out with the file to flatten the face where the chaincase bolts up and on the reverse to where the nut and washer sit, in just 5 minutes and another pile of alloy filings on the floor. all was neat and tidy.
 |
| old plates |
The next trick was drilling the mounting hole in the right spot.. not so easy as the bolt mounts blindly into the chaincase so locating the right spot to drill the 'new lug' was a shot in the dark until i had an eurecka moment and out came the chewing gum and onto the face of the new mounting, press the case up to it and hey presto the exact spot to drill.
Simon Bateman Nametab quickly effciently and importantly cheaply, provided amongst other stuff the rubber chaincase to clutch seal. the old one was ' persuaded out' and after fitting the cahincase was offered up to the gearbox/ crank case, there is a little sideways 'adjustment' here as the crankcase is not quite round so that the timing chain can be 'tightened' so plenty of silicone would be required to prevent muck/ water getting in.
To give it a chance to make a decent seal I put the silicone on and bolted the outer chainceas up so that it all sat nice and square and left well alone for 24hrs to let the silicone 'go off'
To give it a chance to make a decent seal I put the silicone on and bolted the outer chainceas up so that it all sat nice and square and left well alone for 24hrs to let the silicone 'go off'
 |
| engine sproket and timing chain adjuster |
 |
| new clutch plates and basket |
 |
| kink added to brake rod |
Tuesday 15 February 2011
Thats gotta hurt!
Practice makes perfect so up to the quarry on Saturday to get used to the bike over the bigger rocks, I also took the chance to fine tune the carb. The Villiers set up I have is just about spot on but a little movement on the airscrew coupled with the lower gearing had the bike moving very slowly, smoothly and consistently on tickover especially on descents the trip to the quarry also gave me chance to ride with the new tank for the first time, I wanted to make sure that it was clean inside so i ran THREE fuel filters! and it gave me the opportunity to find out how much fuel the tank held, as it turns out a little under 3 litres of which about a half litre is reserve, more than enough for a single venue trial.
Full of optimism that even a rain fall of Biblical proportions could not dent I set off at Addingham Moorside for Yorkshire classics second Championship round.
The venue is notoriously rocky and peaty so I set off early to get the best of the sections blazing a trail yet avoiding the gooey mess that some sections would inevitably become.
The first was a simple affair in and out and over some benign rockey and although the second was a staple of the venue I fell foul of it and dropped into the stream and stopped dead... ouch. A precautionary dab on the third then a run of cleans until i three'd my way out of Mick Driifield's steep rock gully and that was it for that lap. I cleaned the tricky 7th and found a cracking route in 8 up and over a massive boulder that others rode around section 8 I chose the hard route as the clubmans route had some tight turns to avoid the loose rocks that I personally felt comfortable riding over, lap 2 was even better I only dropped the one until section 8 when disaster struck, the clutch seemed to drag then the rear brake locked on , going up hill,, and ouch the chain wrapped itself around the gearbox sprocket and lifted the chain case up destroying the lugs on the gearbox..
I had the bike to bits in a jiffy but could nt find anything obviously amiss until I put it together again and noticed that the rear wheel had about 20mm of sideways and vertical movement even when bolted up tight.. I assumed the Sherco alloy spindle had cried enough

Back home I had the thing in bits and I had to apologise to the spindle, it had borne its weight and more in the breakdown, the culprit was the nearside rear wheel bearing which had had a catastrophic failure. The inner race had totally separated from the bearings and outer cage causing the rear wheel to move which lead to the chain jumping which preceded the destroyed gearbox mountings.
 A couple of phone calls firstly to Simon Bateman Namtab who promised all the clutch bits and bobs would be in the post later that day and to the benevolent Ady Brayshaw who agreed to sort some alloy welding of the gearbox lugs with the box in situ.. that though will have to wait till next week as this week other projects dominate! in the meantime the pics show clearly the damage to the gearbox lugs and the clutch been stripped down ready for Simon's delivery!
As for the trial another great trial from Yorkshire classic and befitting of the best pre 65 trials club in the country, a decent entry in horrble weather at a venue renowned for rocks all the sections were rideable yet challenging and all cleanable with care and skill and a half decent bike!
Thursday 10 February 2011
Chain reaction
 One of the issues carried over from the original bike was ''what exactly is the chain size'' and the state of the rear sprocket. The chain was a Renolds with no size markings and an old 420 seemed the right thing but it was hard to state 100% as the rear sprocket was so well worn, however a new 420 chain was just a fraction too tight on the teeth, it fitted but was a little 'clingy' so we used a 428 std chain in its place
This was ok although the clearance for the spring link was a little fine so rather than have the link to the outside it was mounted inboard temporarily.
Wanting a final solution I was prepared to put new chain and rear sprocket on, the only issue been where to get a sprocket certainly not off the shelf and then from the inter-web up popped 'Sprockets Unlimited'
All they asked was that I choose chain size .. 428 easy that bit, No. of teeth.. well original was 58 but as as some old wag at a trial suggested it was a tad highly geared I plumped for 60 this time. centre diameter.. now the original is a SUNG fit round the brake and even has a little machined off to make way for the bolts so out with the micrometer and a figure was agreed (after measuring 5 times to be certain) Then the bolt centres... again measured five times, they have to be spot on..

I've recommended other suppliers on this site before but these guys take the top award, in less than a week the thing arrived absolutely SPOT ON no margin of error whatsoever . It bolted straight on, very impressed. and the extra two teeth only add 8mm to the diameter so only the engine will know the difference.
As I bolted the wheel back in I took the time to add a 3mm spacer to the drive side spacer just to move the chain over and more easily clear the clutch case. If this is succesful I'll machine new spacers for the rear axle, I'm especially keen to make the one for the offside like a cup to offer some protection to the exposed bearing on that side of the hub.
Friday 4 February 2011
night of the big hammer..
Having a vaulted ceiling space in the garage has been great for storage it does though have two downsides, firstly when the heating is on it rises up to the eaves keeping the pogo sticks, strimmer et al nice and cosy whilst I suffer in the cold! Secondly although a couple of 58 watt 1.5 meter strip lights are okay, they don't give all the light I crave. Armed with half a dozen sheets of plaster board 10 down lighter and 25m of two core 1.5mm cable and a wiring diagram from my sparky I set to work, and now I have a half complete ceiling complete with 5 down lights over the work bench and I can see clearly ( which is certainly not the verdict my optician offered this morning!)
Following last weeks very rocky trial at Nab End near Sowerby Bridge I've a couple of issues to deal with. The new bike stuff, are the steering bolt needs re adjusting as it comes loose and yet the bolt does'nt seem to have turned so I assume that the taper rollers are bedding further in through the grease, tightening it all up isn't an issue though loosen the yolk bolts, the top snitch bolt and away you go.. 30 seconds of a work plus an hour talking to a neighbour and the jobs done.
There is a pretty nasty noise coming from the chain case so that will have to come off I suspect that the case isn't on quite right and one of the edges is touching the clutch basket.
The only damage in the trial was to the rear brake lever it took a bite out of a Yarkshire rock and came off second best, so out with the lump hamme, off with the arm and into the big vice, a bit of swearing and hey presto as good as new!
total cost for the weekend
£ 10 join club ( annual fee)
£ 10 entry fee
£ 2.60 2 litres of petrol
Even bigger hammer called for!!
The nasty chaincase noise has been resolved ( hopefully), whipping the cover off the damage was easily visible. The 37a chaincase has little in the way of clearance for the clutch basket and the tangs of the clutch plates and for reasons unknown the little blighters had been rubbing on the inner chaincase. A bit of head scratching and the solution/ reason wasn't obvious until I tried to refit the case and it would'nt quite go back. The lower case guard at the front of the engine had obviously taken a bit of a thump and moved the outer back by a couple of mm. So in true Yorkshire style out with a delicate lump hammer and seven bells of s##t later and it was back in place allowing the case to be refitted exactly right and thus no more nasty noise .. ding dong!
In metal working mode I had a long bout of a good case of looking at as the brake rod caught my eye and it rubbed the rod in the shock so in the vice with it a natty kink was added and it looks good and does the job
..
Wednesday 2 February 2011
first time out...
 Having had extensive post build testing (started bike and pushed it in the back of van) I lugged the bike up to Yorkshire Classic 1st Championship round at Deer Park/ Lady Lane Bingley. 2011 trials
Renowned for rocks and slippy climbs it would prove a decent testing ground and so it did .
Been the first round of the year there was a fantastic turnout from dabbers such as octogenarian Bill Hill to respected modern bike riders like James Noble, as well as the usual eclectic mix of former works riders, collectors, enthusiastic hopefuls and those who should know better.
The bikes reflect that to, for all the issues elsewhere on eligibility, here's a sensible approach with everything from very trick 2011 cubs to pulled out of the barn oily rigids all broadly within the clubs clear rules.
 With riding a new bike and with the venue having a reputation as getting tougher the later you ride I set off smartly and was probably in the first three to do the first half dozen sections. At that point it was obvious that the clutch was slipping badly and that the rear wheel needed tightening up so a quick ride back to the van had the clutch adjusted and the rear spindle adjusted and we were off ( a little too quickly!) the next sections were on the long ride out over the moor in the stream that in previous years had dried up to an almost desert like state of loose dry rocks. However as global warming slips by West Yorkshire the stream was FULL of water and proved a decent test on the steep slippy climb out.
Now the quick 'pit stop' played its hand as I started the second lap and just before I started section 4 with its very steep descent I looked down and saw the rear brake steady was loose ( come off actually) so returned to the van for more 'tweaking' ie new bolts! official photos of the trial
 So for a first time out the bike had had some drama but overall the ride was positive the longer wheel base over the Banvill was noticeable on helping to keep to a line and yet the bike still turned well and without the front wheel tucking in. the engine, been a direct transfer was brilliant, I could' nt ask for more (I've no doubt others might but for a dabber it was more than adequate) the fork angle was commented on as steep but having given it a good coat of looking at I think that's down to the yolks which pull the stanchions in a smidge.( don't know if you can see in the snaps.) I do have another pair of billet yolks in the workshop but unless its a problem that's where they will stay.
So back home quick wash of the bike oil the chain and shes ready to go again.. who said old Brit bikes need lots of attention... as for the rider Doh! must do better, lose weight, pay attention, get fit, practice more... the usual excuses.. importantly theres always tomorrow.
Without the file to hand I've put some snaps on from Keighley Gate Preunit trial at the end of last year.. the keen eyed will spot the money grabbing observers building thier college fund!


Friday 21 January 2011
Brake!

To get the pedal to rest at the right level Ady had welded a small piece of steel to leg of the rear sub frame and half an hour with the file had a small but perfectly formed and positioned stop
I also took the grinder to the edges of the lever to smooth them off so that the precious boots don't get caught.In the coming months once the bikes running I'll develop this pedal further with a little reshaping and some 'drilling' as nothing weighs as little as a hole!
The next step was sorting out a brake rod / cable. I originally favoured a cable as it has to run through the rear shocker spring, and I hoped there would be less chance of fouling if I used the cable. Unfortunately the amount of 'stretch' in the cables I tried was unacceptable, so a more traditional rod was called for. A length of 6mm stainless rod was threaded at both ends and suitable fittings pilfered from the parts bin ( actually a 100 litre plastic cistern briming with ' previously loved' stuff looking for a new home)
Movement from 'off' to 'full on' is approx. 15mm so it works well and with a little work will look just as good, until then function is king.
Progress!

The first thing that needed resolution was the brake pedal. Although a pedal had been bought with the frame it was unsuitable ( wrong size pivot hole, arm was too short and had less than 5mm movement when mounted before it hit the foot rest) so alternatives were checked out and the neatest solution was to use a Sammy Miller tiger cub stainless lever from the parts bin and reposition the pivot point on the bike.
The very amiable Ady Brayshaw in Halifax 07984 160944 quickly had the new pivot point welded neatly to the bike and whilst he did that I checked out a very nice TY80 tank that he had just painted in petrol proof two pack. The conversation moved to how I was going to paint the frame and Ady agreed to do the job himself the next day and have it back to me within 24 hours for a very reasonable sum. The only downside was that I'd have to have the dry build complete and the bike stripped and back to Ady's within 24 hours...
Monday 4 October 2010
The man that can..
One of the essentials of pre 65 trialling is knowing someone who knows whats what what works and what doesn't. I 'm fortunate to have one on my doorstep, the other is knowing a 'man who can 'so that when your muse tells you to head off in one direction you have someone to hand who can make stuff ( well is essential, quickly is good, cheaply is fantastic!)
Access to a decent lathe and knowing how to use it, an industrial pillar drill and a stock -pile of various metals in sheet, rod and tube are all strong qualifications so step forward my father.
Normally happily making model steam engines ( stationary, rail and marine) or sailing or running them, he can usually be persuaded to produce some fantastic pieces of bespoke metalwork such as bushes, spacers and tube etc. all to your specific requirements. Over the years we have found that rather than working to drawings and measurements it is much more accurate to build to fit. Especially so on sthings like swinging arm bushes where the present dimensions may be far from what they were originally. and where two formally identical round holes are no longerround nor identical.
So to the depths of the Lake District I travelled armed with a box of aluminium sheet and rod plus the bike as it stood so that we could 'make to fit' . Hopefully at the end of the day iIwould have pre load spacers for the forks, spacers for the rear spindle, an original pre 65 rear brake plate that fitted the Sherco 17mm spindle and various other spacers.
In the space of a couple of hours we had the rear spacers turned on the lathe and drilled out for the 17mm spindle and they fitted first time! We made up mock ups with 22mm copper tube to get the right lengths so that the wheel was centred and the chain ran true then replicated them in alloy. The off side was simple as it is single piece and on the chain side we cut two pieces so that they and the brake back plate made up the required distance and bingo..
The brake back plate soon became the owner of a 17.5mm hole.
The brake back plate soon became the owner of a 17.5mm hole.
i have earlier said that the forks ran great and they do but they do 'sometimes' have a tendency to drop a quarter of an inch upon putting weight on them. I believe that this was because i was using an old valve type spring in each one as a preload spacer. Springs being what they are I suspect that they moved a little and became unseated so we made up a couple of 'top hats from alloy to do the job instead and popped them in.. As near as dammit the same sag and suspension movement so we'll try them ( movement of the old valve springs was approx 5mm over their 35mm length so we opted for 32.5mm long spacers as a mid point)
I think i also mentioned earlier that some of the brackets were 5 - 10 mm too wide so we made some tube to use as spacers rather than packing the gaps with washers.. I ended up with 8,10mm and 3/8 of an inch i/d tubes with an o/d of 15mm.
a nice days pottering and a decent lunch thrown in!
Saturday 2 October 2010
Shopping list..
 Well firstly some photos from my design board of what it is I'm building, most of the bikes I've photographed myself at Yorkshire Classic trials or at the Pre65 SSDT. the style I am trying to recreate is best exampled by the top bike. Mine will almost certainly though have white plastic guards front and rear as well as an alloy tank with a white crescent.
Just to even things up a bit after posting the last update I realised i'd missed a few suppliers out.. so best pop them in to create a fair view of whats been bought.. no expenditure figures until the end so that in best 'Grand Designs' fashion I can boast of only using 80% of my contingency fund!


 Anyway more bearings via ebay from EBR, 18mm with 13mm shank drill bit via ebay from Uk Drills ( this for a fantastic piece of bespoke metal work and fabrication from the countries leading steam boat engineer! more to follow in a special piece soon) rubber washers from Naoutlet All these suppliers delivered within 48 hours of making a Paypal payment.
 Finally the only personIi've done face to face business with the brilliant Andy at Pennine Trialsport although not specifically into pre65 or twin shocks he has a fantastic background knowledge and is more than happy to root through his parts bins for something off the peg! the bike now sports a GasGas chain tensioner and an aluminium Sherco rear spindle that weighs a third of the originally proposed steel one. all thanks to Andys' perseverance.( and they fit first time with no modification!) to complete the theme i'm searching for something from the other three manufacturers that will also fit the bike. ( Beta, Scorpa, Montesa)
The rear spindle did give us our first 'proper' engineering problem/ solutions and when I have a moment I'll go a little further but it did involve a 180 mile round trip and a day out in the Lake District..
Photos..well I've taken loads on my new Nikon all I have to do now is get the pooter and camera to speak to each other, so when they come they will probably all come at once..
How much is scrap aluminium worth?
The postman and UPS have been busy and have dropped off a load more bits and bobs for the bike including spherical bearings for the shock lower mountings, imperial bolts for the engine mounts, rubber washers to mount the rear mudguards and a rear brake pedal.
 I spent a couple of hours head scratching trying to work out how to fit the brake pedal, but as it was built for the frame buy the frame builder and 'bolts straight on..' I assumed that it would .. however the bolts used are larger than the mounting, the arm fouls the sub frame, the mounting fouls the footrest mount, the total movement is only 12mm and the actuating arm is about 60 - 75 mm too short.. so it probably wont see the light of day..
On the other hand small stuff arrives by the bucket and is 100% correct just as ordered. Big shout out to Namrick for thier imperial nuts/bolts and Simply Bearings for the spherical bearings ( they have a handy calculator on thier site which tells you what size bearings are available, you tell it what sort you want and one of the dimensions and it does the rest) still not quite as impressive as the man at Rochdale Bearings who armed with a well thumbed reference book found the right mix of imperial and metric sizes for the steerer bolt.
So the engine/ box came out and the bolts were machined to length, half the head of the lower mount has to be machined off so that it can clear the chain case. I opened up the engine mounting holes on the rear mount as they were slightly adrift of where they should have been. opening them up to 12mm sorted that out. The engine protector ( a piece of bent bar that protects the front of the chain case) fitted spot on via the front engine mounts.
 Then out with the file and Dremel to fabricate an alloy bracket that holds the clutch adjusting screw, the exhaust mounting and with a little thought serves also as the lower mounting point for the rear mudguard! starting off looking a little agricultural within 4 hours it looks smart but importantly is functional and easily adjusted etc. the only downside is that the floor of the garage the workbench and I are all covered in about a hundred weight of alloy filings. Time for the sweeping brush!
Wednesday 29 September 2010
Airfix kit with no instructions and with some pieces missing!
The plan was to dry assemble everything, so that i knew what went where, what fitted what needed doing to what etc before any paint or powder coating was applied to anything. this meant that the build may take a little longer but that when final assembly came along everything would fit as i'd already fitted it once before.
first things first preserve the frame.
as picked up from the M6 it was in bare metal with its bronze brazed joints loud and proud. There was plenty of flux visible so as soon as it landed in the garage i took out the plumbers Yorkshire Pad and gave the frame a good rub down to clear the flux and and slight surface corrosion.
 this gave me a chance to give the frame a close inspection and a good coat of looking at. first impressions were that the brazing was first class and that the joints were all well made with no lugs in sight. the headstock was long ( circa 150mm) and wide (52mm) compared to my previous cub and bantam frames and that at the rear upper shock mounts the bike seemed quite wide about 40mm wider than both cub and BSA yet narrower at seat/ tank junction than both by about 10mm.
 the rear shock position seemed more 'laid down than both the other bikes and the 'engine room' significantly shallower than both bikes ( at least 25mm) overall the impression was of a strong frame with robust proportions that coupled with the T45 tubing would make it up to the job of supporting my svelte like 100kg frame!
 I'd hoped that removing the motor from one bike it would drop cleanly into the other and initially this seemed to hold true withe the engine complete with carb lifting cleanly into the frame of the James/FB. the reduced height was immediately confirmed but was adequate with no immediate issues. the front engine mount was perfect the bolt went straight in, and the middle/lower seemed to do the same , unfortunately the rear was approximately 5mm out and the engine mount would require re drilling also concernedly the mount was 3 mm too wide on the near side of the bike and 4 mm too wide on the off side.checking the lower/ middle mount I found that although the bolt holes were perfectly in line the off side Mount was approximately 8mm too wide.
the lower mount was easiest to solve by maching a spacer from 5/8 inch aluminium rod/ bar. the rear mount is more complex as it is also the mount for the clutch cable and silencer.
on to the biggest looking issue was the size of the headstock it was about 25mm longer than either of my existing bikes and thus seemingly too long for either of my bolts on the.other bikes. setting that aside it was massive internally compared to the other bikes the cub and BSA both having and id of circa 42mm the james/fb was 47mm. Alan had recommended a bearing size of 47x25x10 sadly that was never going to fly as both my head bolts are imperial sized 3/4 inch which comes out at 19mm give or take.
Subscribe to:
Posts (Atom)